July 24, 2019
Pause
My microwave has a turntable that slowly rotates while the microwave is on. This is pretty common, but the turntable has a bit of a quirk. It doesn’t rotate at a consistent rate, but hesitates every quarter turn or so.
Tuuuuuurn, pause. Tuuuuuurn, pause.
For years, this has unsettled me. Is something wrong with it? Will it stop working altogether soon?
Tonight I watched a mug of warm milk in the microwave.
Tuuuuuurn, pause. Tuuuuuurn, pause.
I watched the milk gently slosh back and forth in the mug.
Tuuuuuurn, pause. Tuuuuuurn, pause.
I had a new thought. Does the sloshing help the milk heat more evenly? What if the turntable is supposed to do that?
June 12, 2019
Decodable
Simple things should be simple, complex things should be possible. — Alan Kay
As programmers, we like to organize stuff into data structures like classes, structs, and enums. And (especially as Swift programmers), we like our data to be strongly typed. However, apps often have to talk to the rest of the world, usually file systems and “the cloud”. In those contexts, data is “serialized”, or transmogrified into an array of bytes. So we want tidy, reliable ways of turning data structures into streams, and streams into data structures. There are a number of frameworks that do this work. Two that Apple provides are Codable and NSCoding. This post is about Codable, and perhaps I will write about NSCoding in a future episode.
Vocabulary
Converting data structures into streams is called “serializing” or “encoding”. If you want to transform your structure into Data, suitable for streaming, your class, struct, or enum must conform to Encodable.
Similarly, converting data back into a class, struct, or enum is called “deserializing” or “decoding”. Your data structure needs to conform to Decodable so that it can construct itself from Data.
An Accessible Example
Here is a concrete example. Perhaps a designer has sent you a mockup that looks a little like this. It has some really prominent dark text for the title, and the subtitle is only a little smaller and slightly lighter gray. Then there’s more text that’s even smaller and even lighter.
 Mockup of text in decreasing size and contrast
When I got a mockup like this, I felt like I had to strain a bit to read it. So I worried that it might not be accessible to others. I’m not a designer, and I’m certainly not an accessibility expert, so I struggled with how to decide what was “enough” contrast, and how to effectively share these concerns with the designer.
It soothes my brain immensely to learn that there is a definition of “enough” contrast, backed by field research, the biology of how humans perceive light, and math! There’s a single number to define the contrast between any two colors, and a grading scale for what numbers are good enough. Not only that, but there are websites for looking up these numbers, such as webaim.org, so we don’t even have to do the math.
Here’s the contrast for black and this particularly delightful shade of purple. This combination gets a triple-A rating when used for large text, but only a double-A rating for small text. These colors are fine together for titles, but it would be better to find a slightly higher contrast for paragraphs of text, if possible. 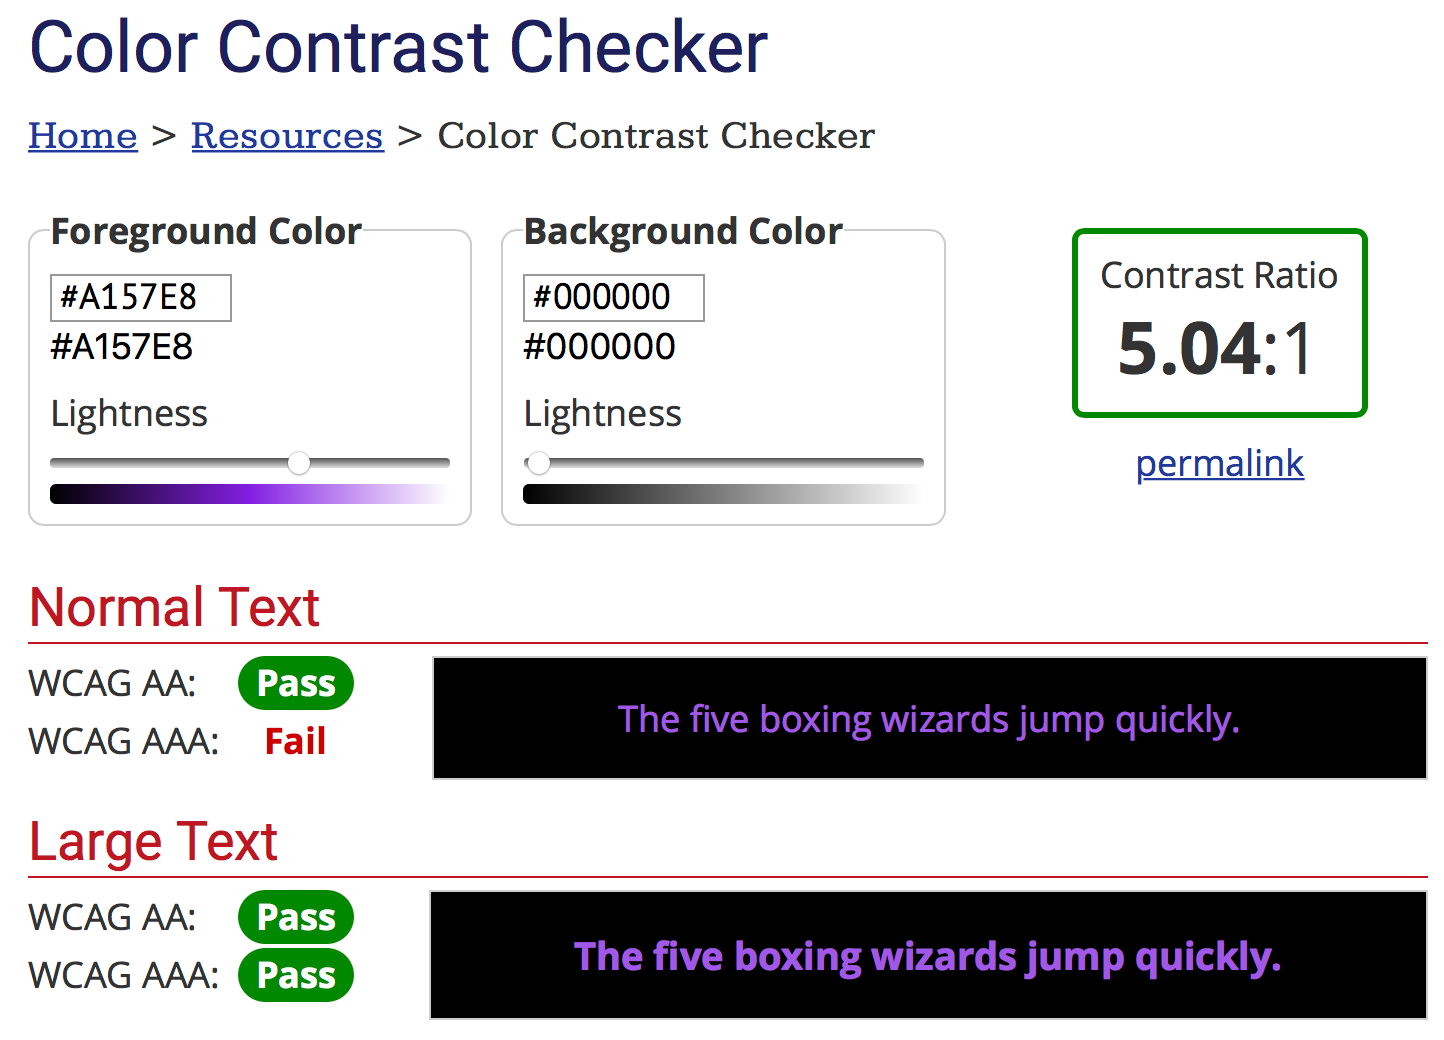
So, that’s a nice accessibility tip, but this blog post is about serializing data. This website is in the cloud, and it has an API. If you add &api to the URL, instead of a webpage, the site serves up some JSON data containing the same information.
// The WebAIM service provides contrast analysis in JSON format.
// https://webaim.org/resources/contrastchecker/?fcolor=A157E8&bcolor=000000&api
{
  "ratio": 5.04,
  "AA": "pass",
  "AALarge": "pass",
  "AAA": "fail",
  "AAALarge": "pass"
}
And if you squint at this JSON just a little, it starts to look like a Swift struct.
struct WebColorContrastResponse {
let ratio: CGFloat
let AA: String
let AALarge: String
let AAA: String
let AAALarge: String
}
Now you have some data and you want to convert it into your data structure. That means you need to add conformance to Decodable on your data structure. What does it look like to conform to Decodable? There’s only a single required method in the protocol: init(from: Decoder).
Here is an implementation of this initializer, with a CodingKey enum to organize the data’s keys.
struct WebColorContrastResponse: Decodable {
init(from decoder: Decoder) throws {
let values = try decoder.container(keyedBy: CodingKeys.self)
ratio = try values.decode(CGFloat.self, forKey: .ratio)
AA = try values.decode(String.self, forKey: .AA)
AALarge = try values.decode(String.self, forKey: .AALarge)
AAA = try values.decode(String.self, forKey: .AAA)
AAALarge = try values.decode(String.self, forKey: .AAALarge)
}
enum CodingKeys: String, CodingKey {
case ratio = "ratio"
case AA = "AA"
case AALarge = "AALarge"
case AAA = "AAALarge"
case AAALarge = "AAALarge"
}
let ratio: CGFloat
let AA: String
let AALarge: String
let AAA: String
let AAALarge: String
}
This is certainly possible, but a little tedious. The initializer sets each property explicitly, and the CodingKey enum provides a string mapping for each property, so this relatively short code listing mentions each property three times. If you need to add another property later, you’ll have to add information about it in all three places. I don’t like that, you probably don’t like that. Fortunately, the developers of Codable didn’t like it either. They came up with a shortcut so you don’t have to write all this.
In many cases, the Swift compiler can generate all this code automatically. If every property in your struct is Decodable, just declare your struct Decodable and you’re done. Or if your enum is backed by a Decodable type, you can get free conformance on the enum. Just say it conforms and you’re done.
struct WebColorContrastResponse: Decodable {
let ratio: CGFloat
let AA: String
let AALarge: String
let AAA: String
let AAALarge: String
}
Dealing with the Real World
This is all fine if you have total control of the data format. But life isn’t always so tidy. Maybe your data comes from a server that uses different naming conventions. Now your keys don’t look like Swift property names, or might be confusing in the context of your code. If you want to customize the keys, bring back just that CodingKeys enum. List all your properties, and specify the string values for the ones you want to customize.
struct WebColorContrastResponse: Decodable {
enum CodingKeys: String, CodingKey {
case ratio
case smallDoubleA = "AA"
case largeDoubleA = "AALarge"
case smallTripleA = "AAA"
case largeTripleA = "AAALarge"
}
let ratio: CGFloat
let smallDoubleA: String
let largeDoubleA: String
let smallTripleA: String
let largeTripleA: String
}
Sometimes that’s not enough. Sometimes you need to do more custom handling. Maybe the types don’t match. When I first looked at the JSON from webaim.org, the data structure looked like the original example above, and I wrote a Playground around fetching and processing this data. Then I came back to run my code a few months later, and it didn’t work at all. After way too much frustration, I realized the web service had changed the type of the ratio from a decimal number to a string! (Here is an updated version of that Playground.)
If you encounter a mismatch like this and need to cast types or do other custom handling, you should write an explicit implementation of init(from: Decoder). Like any other initializer, this method must initialize each property. If anything might go wrong, you can throw the same sort of DecodingError that would have been thrown by the compiler-generated initializer, or you can handle the failure case with a fallback value or something else that makes more sense for your situation.
struct WebColorContrastResponse: Decodable {
init(from decoder: Decoder) throws {
let values = try decoder.container(keyedBy: CodingKeys.self)
let str = try values.decode(String.self, forKey: .ratio)
guard let ratioAsDouble = Double(str) else {
throw DecodingError.typeMismatch(…)
}
ratio = CGFloat(ratioAsDouble)
tripleA = try values.decode(String.self, forKey: .tripleA)
}
enum CodingKeys: String, CodingKey {
case ratio
case tripleA = "AAA"
}
let ratio: CGFloat
let tripleA: String
}
More Special Cases
For JSON, there are even more ways to adapt JSONDecoder to the realities of your situation. If you’ve got dates to parse, you can configure the JSONDecoder to use one of the standardized strategies, or even define your own if you’ve got some really quirky dates to wrangle. If your data keys don’t need full renaming, just converting from one naming convention to another, you may be able to specify a keyDecodingStrategy to avoid having to create a full CodingKeys enum.
Opinions on Style
Now, if I may, I’d like to offer a couple opinions on stylish implementations of Decodable.
Consider the full struct, with custom key names and an explicit initializer to deal with the type mismatch. Even in this small example, with only five properties, the code starts feeling pretty cumbersome. The first thing you can do to tidy this up is move the protocol conformance to an extension. The separation makes it really clear what parts of the code are the basic definition of the data structure, and which ones are particularly for Decodable. Also, the custom init(from: Decoder) is no longer in the struct definition. When a struct has no explicit initializers in its definition, the compiler synthesizes a basic initializer that has a parameter for each property, in the order they’re defined. With the Decodable initializer in the struct, that basic initializer wasn’t being generated. By moving the Decodable initializer to an extension, the basic one will be synthesized again.
struct WebColorContrastResponse {
let ratio: CGFloat
let tripleA: String
}
extension WebColorContrastResponse: Decodable {
init(from decoder: Decoder) throws {
let values = try decoder.container(keyedBy: CodingKeys.self)
let str = try values.decode(String.self, forKey: .ratio)
guard let ratioAsDouble = Double(str) else {
throw DecodingError.typeMismatch(…)
}
ratio = CGFloat(ratioAsDouble)
tripleA = try values.decode(String.self, forKey: .tripleA)
}
enum CodingKeys: String, CodingKey {
case ratio
case tripleA = "AAA"
}
}
let serverResponse = WebColorContrastResponse(from: someDecoder)
let locallyAssembledResponse = WebColorContrastResponse(ratio: 2.6, tripleA: false, doubleA: false, tripleALarge: false, doubleALarge: false)
It might be worth going even one step further. Reduce the primary web response struct back down to its most basic form, with auto-synthesized conformance to Decodable. Then create a separate data type which can be initialized from this web response struct. The web response provides a concise record of your code’s contract with the service, and the new type can encapsulate all the bridging from that web response, providing a more elegant interface to the rest of your code.
struct WebContrastResponse: Decodable {
let ratio: String
let AA: String
let AALarge: String
let AAA: String
let AAALarge: String
}
struct ColorContrast {
let ratio: CGFloat
let smallTextRating: Rating
let largeTextRating: Rating
}
extension ColorContrast {
init?(webResponse: WebContrastResponse) {
guard let ratioAsDouble = Double(webResponse.ratio) else { return nil }
ratio = CGFloat(ratioAsDouble)
smallTextRating = Rating(webResponse.AA, webResponse.AAA)
largeTextRating = Rating(webResponse.AALarge, webResponse.AAALarge)
}
}
enum Rating {
case doubleAPass
case tripleAPass
case fail
init(_ doubleA: String, _ tripleA: String) {
switch(doubleA, tripleA) {
case ("pass", "pass"): return .tripleAPass
case ("pass", "fail"): return .doubleAPass
default: return .fail
}
}
}
Encodable—briefly
Encodable is quite similar, and probably doesn’t need an in-depth explanation here. However, there is one really useful configuration option on JSONEncoder. With .outputFormatting you can specify .sortedKeys. Most JSON decoders—including Swift’s JSONDecoder—won’t care what order the keys are in. But it’s very handy in automated tests to compare the JSON as a String or Data with some expected value. If the keys are not in a predictable order, such a test will fail. Even worse, it won’t always fail, because sometimes the dictionary will be in the exact order your test specified.
Author’s Note
You may be thinking this post ended a little abruptly. It is a reconstruction of the first half of a talk I gave at Swift by Midwest in Spring 2019. The second half of the talk covered ways to combine Codable and NSCoding to (1) use Codable Swift structs in State Restoration and (2) wrap NSCoding-conformant objects inside Codable types.
March 30, 2015
(This post was originally published to Medium in 2015. Some tools have changed since then, but the principles still hold up.)
You’re filing a bug because you think this product is worth making better. So give the developer the information they need to understand the problem. You can file better bugs with this one simple trick: a screenshot! Sure, some bugs are deep in the SDK and there is nothing to take a picture of. But for most issues — in your code, in a beta app you’re taking for a spin, in Apple’s apps and OSes—a good screenshot can be worth a lot of words. So, what makes a good screenshot?
- Shoot
- Crop
- Annotate
- Obfuscate
- Scale
Let me show you how to do all of this, with tools you already have on your Mac. (The gremlins in my head are arguing about whether to give you a bunch of alternate tips along the way or just let me show you one reliable way. Perhaps the gremlins can be content to include them in parentheses.)
 Crosshairs with coordinates
Shoot
The first step to getting a good screenshot is to get a screenshot. I’m sorry if this sounds dumb, but they are useful way more often than you think. And they’re sometimes difficult to go back and get later. Some days I take a screenshot every time I see anything funny. At the end of the day I can drag them into the trash. But when a screenshot saves me or the developer an hour of trying to figure out what the heck happened, every extra keystroke that week was worth it.
- On a Mac, Shift-Command-4 turns your mouse cursor into crosshairs. Drag out the region you want to capture, and the file is saved to your Desktop. (Shift-Command-4, tap the space bar, then click on a window or menu to automatically capture that region. Add Option to the click to omit the window’s shadow. Shift-Command-3 to capture all screens — handy when things are so frozen even the mouse won’t cooperate. To show the cursor and do other custom screenshots, check out the Grab app, also pre-installed on your Mac.)
- In the iOS Simulator, Command-S captures a screenshot of each open device window, including Apple Watch.
- On iPhone, iPod, or iPad, hold down the home button and tap the sleep/wake button. That was easy — except it’s still on your device. I’d like to introduce you to an app that’s on every Mac but nobody seems to know about. Connect your iDevice to a USB port on your Mac. Now launch the Mac app Image Capture.
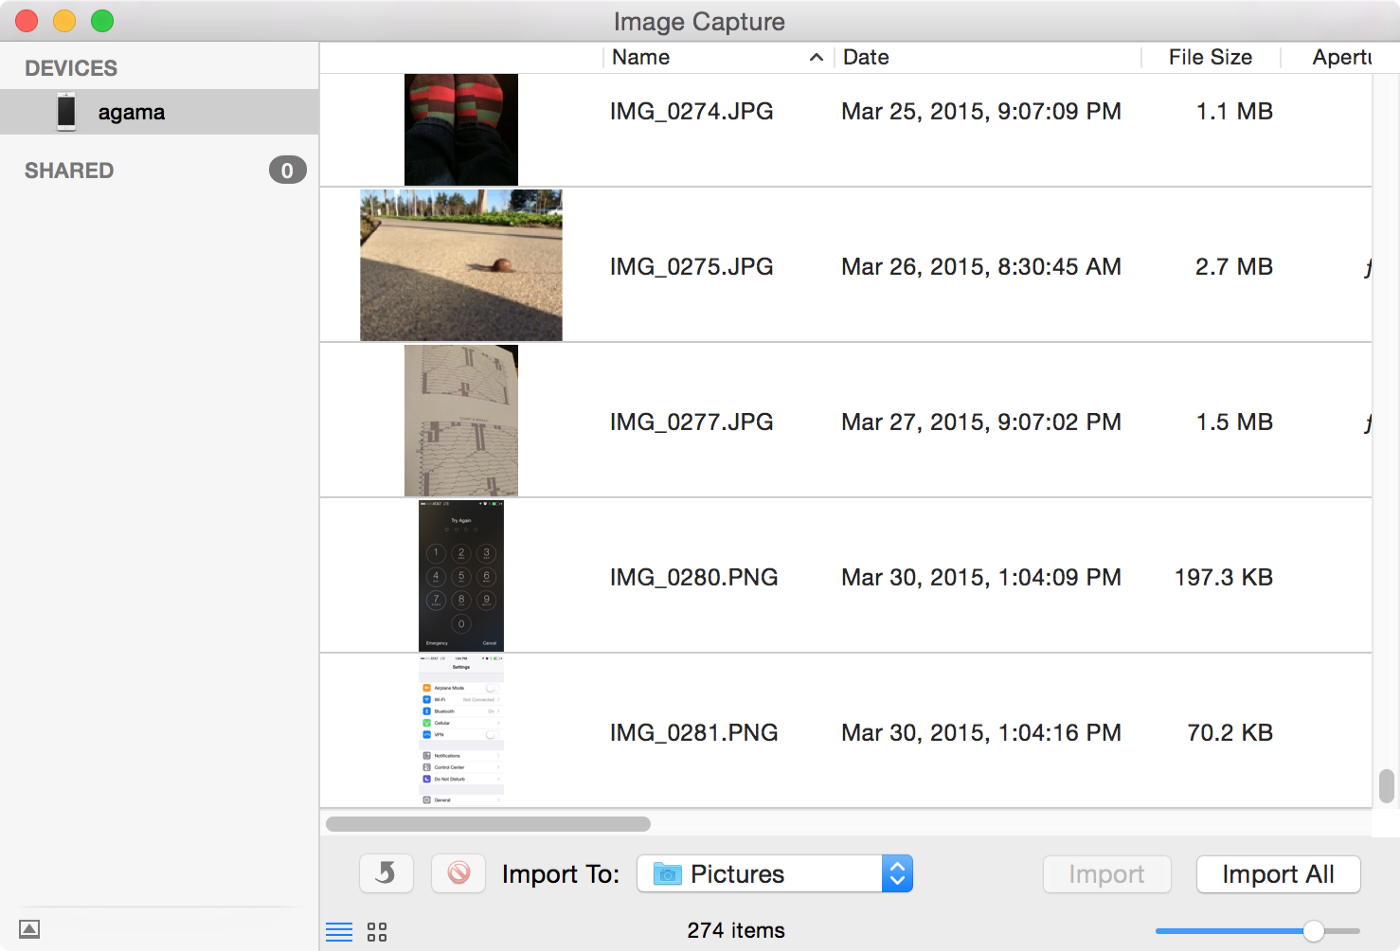 Image Capture, the app you didn’t know you had
In the left sidebar, select your iDevice. Here’s a list of all the images on this device. You probably want the most recent one or three. Select them and import them. Ta-Da! Except you probably forgot to change the destination, so they’ve gone to your Pictures folder instead of the much more visible and easy-to-clear Desktop. (Yes, you could also use AirDrop if your device is new enough, or email if it happens to be set up, but bugs are sometimes found on an old device that has recently been wiped.) So, no matter where you took the screenshot, it’s now sitting on the Desktop of your Mac. Open it in Preview, where we will polish it up to communicate even more clearly.
 Preview app icon
Crop
If the bug is in a toolbar button, you probably don’t need the entire 1024 x 768 pixel window. Drag to select the portion you want to keep and press Command-K. This is not always useful. When in doubt, leave some context around the issue.
Annotate
 Show the Markup Toolbar to get at all the useful annotation tools.
If the relevant part of the image is tiny — but you’ve cropped loosely to preserve context — doodle on the image to draw the audience’s eye to the pixels you’re concerned about. Select a shape tool and a square or an oval will leap onto the canvas. Adjust its location and proportions with the drag handles, line weight and color in the annotation toolbar.
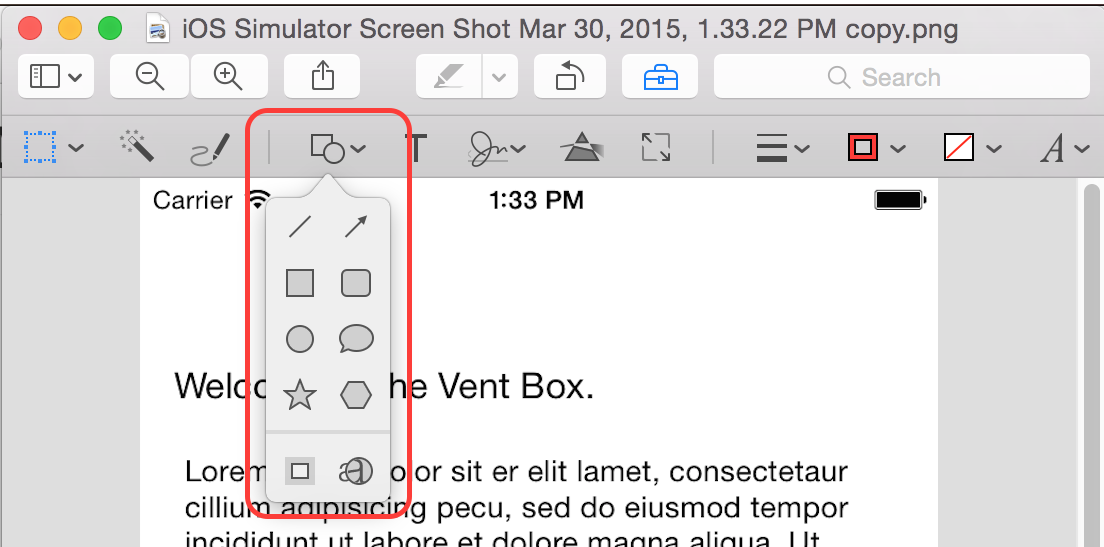 I haven’t found a good reason to use ☆ yet, but I’ll keep trying.
(To accentuate alignment issues, use the pen tool to draw a line on the image. Then shift drag one end to force the line perfectly horizontal or vertical.)
Obfuscate
Sometimes a screenshot will include private info that isn’t relevant to the bug. The developer doesn’t need to know what you were venting about, only that the vent was misaligned with the introductory text.
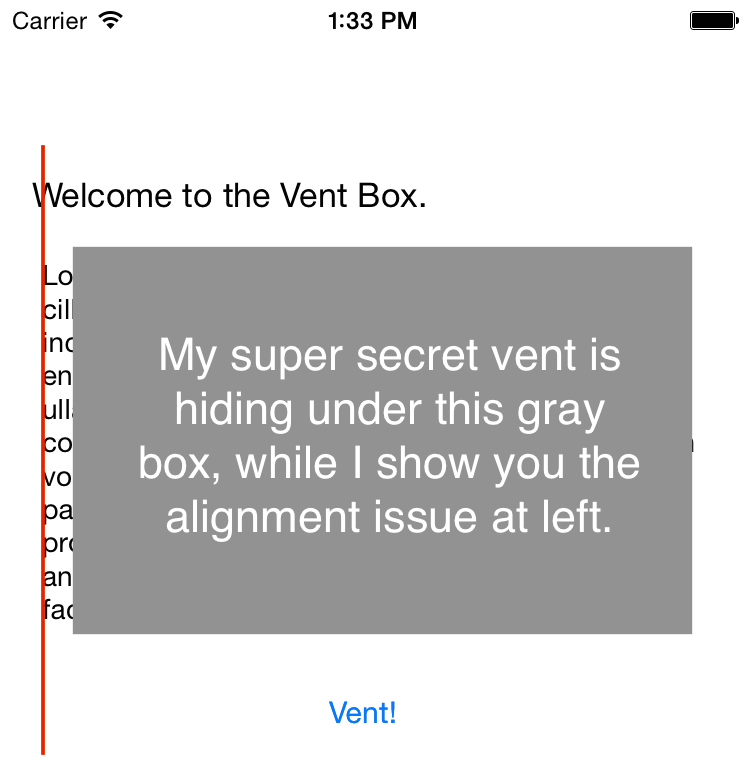 Rectangle of redaction over some misaligned text
Use the annotation tools to draw a shape over the private information, and give it a solid fill. (In some weird cases, annotations are ignored by image viewers, so if this is really private, take a screenshot of the annotated image, and proceed with that image.)
Scale
A retina iPad Air has 2048 x 1536 pixels. A fullscreen image from that will overflow the main display of the computer where I’m writing this. So if the exact pixel details aren’t essential to your story, consider scaling the image. Choose Adjust Size… from the Tools menu.
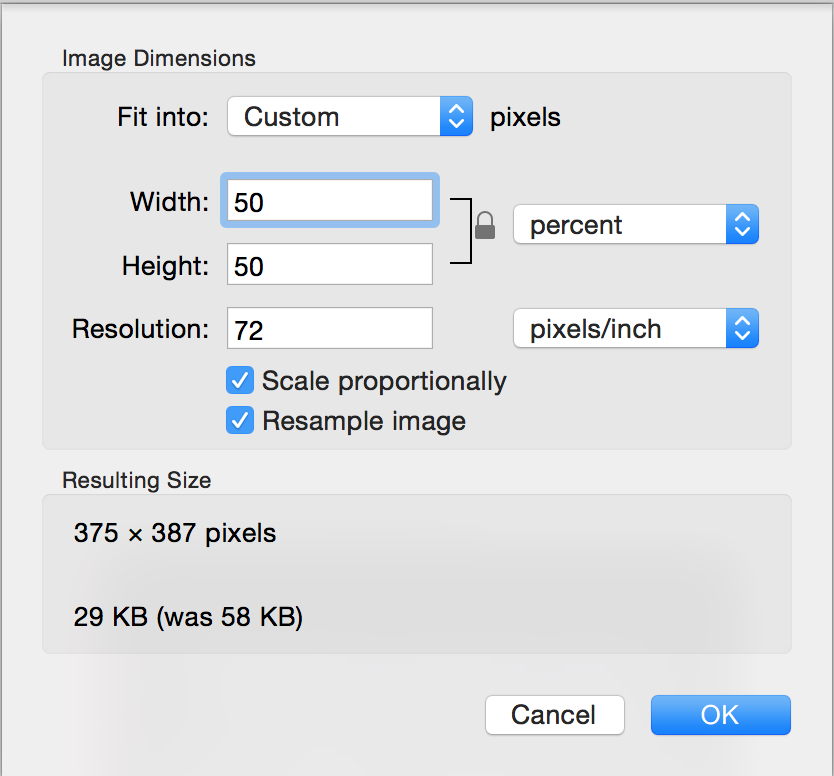 Adjust Size sheet
With the ratio locked and the units set to percent, change the Width to 50 or 25, and the Height will follow and your image will be much more manageable.
More
The gremlins have some more ideas for you…
To capture a flicker, or bad scrolling, or some other moving issue, take a moving picture. QuickTime can capture most anything on the Mac, including simulator screens. (You may also be able to QuickTime capture from a device connected to USB, but I haven’t actually tried it.)
Maybe the bug involves the way the device is held. Use another device to take the photo of the device and your hand.
Recap
Take screenshots! Include them in your bug reports. Bonus points for annotating them.
All images included in this document were prepared with the tools described above.